I need to manage my browser extensions (enable and disable), what should I do?
Open Google Chrome.
Click the Customize and control Google Chrome icon in the upper-right corner of the window.
In the menu, select More tools.
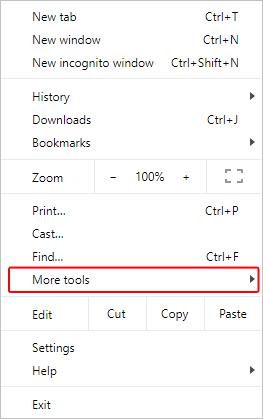
Select Extensions from the side menu.

In the Extensions tab that opens, there are a series of cards in the middle.
Enable an extension
Open the Chrome Web Store. “ https://chrome.google.com/webstore “
Find and select the extension you want.
Click Add to Chrome.
Some extensions will let you know if they need certain permissions or data. To approve, click Add extension.
Important: Make sure you only approve extensions that you trust.
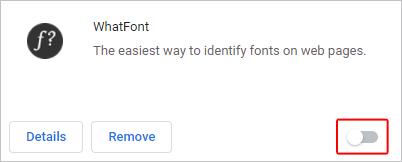
Disable an extension
To disable an extension, locate its card and click the blue toggle switch so it changes to gray.
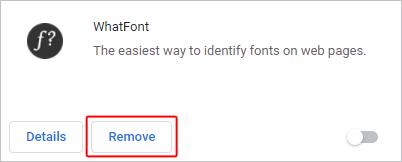
Remove an extension
To remove an extension, locate its card and click the Remove button.
Open Microsoft Edge.
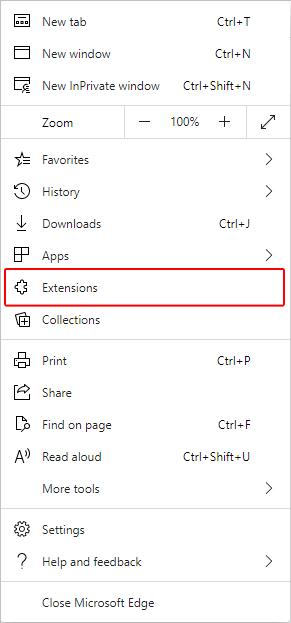
Click the Settings and more icon in the upper-right corner of the browser window.
In the drop-down menu that appears, select Extensions.
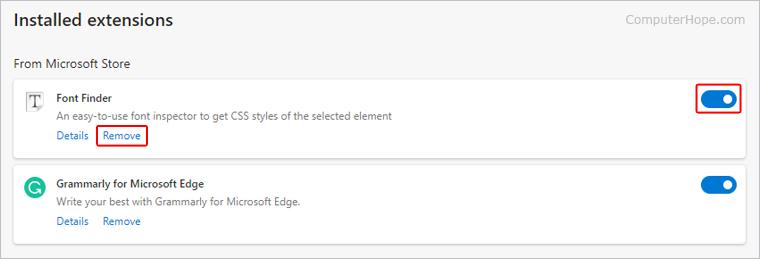
In the center of the screen, under Installed extensions, there is a list of installed extensions.
Disable an extension
Locate the extension you want to disable. Then, on the right side, click the blue toggle switch so it changes to white.
Remove an extension
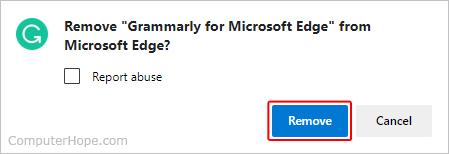
Locate the extension you want to remove. On the left side, click Remove. Then, click the Remove button on the prompt that appears.
In the Apple menu bar, click the selector, and select Preferences.
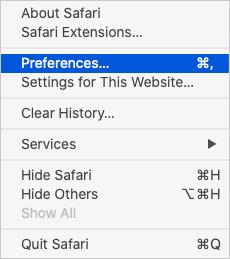
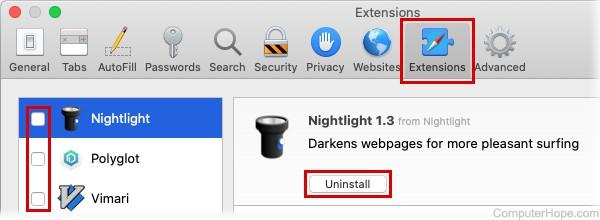
In the Preferences window, click the Extensions tab.
On the left, uncheck any boxes next to the extensions you want to disable.
To remove the extension, select the extension name on the left, then click the Uninstall button.
Related Articles
How to set up Authentication in GMAIL?
Enrolling in two-factor authentication (2FA) for Google accounts significantly enhances account security by adding an extra layer of protection beyond just a password. This reduces the risk of unauthorized access and protects your personal data and ...I need a desk, how do I reserve one in Envoy?
Planning to work on-site? Booking a desk is quick and easy! Follow this simple guide to reserve your workspace and ensure a smooth, productive day at the office. 1. Open the Envoy App on your mobile device, click “Reserve & Check in” 2. Click ...Teleworking and Mobile Device Policy
Ref. No.: CPP-IT-0203_V1_Teleworking and Mobile Device Policy.doc Prepared W. Cundangan 09/21/2015 Approved R. Tan 09/22/2015 1.0 Objective The purpose of these policy is to ensure that security of information and systems, accessed through ...Information Technology (IT) - Definitions
Information Technology (IT) Terms Definition Team Ticket A support ticket created through myHR or by sending an email to otrs@infinit-o.com IT Jumpcloud Account Jumpcloud account or Login credential used to log in to various Infinit-O supported ...I need to reset or access my AllSec, what should I do?
Since Allsec is synced with JumpCloud, resetting your JumpCloud password will automatically reset your Allsec password. Follow these steps to reset your JumpCloud password: 1. Refer to the link for instructions: How to Reset My JumpCloud Password. 2. ...